RDLC (Reporting Definition Language Client-Side) Reports Barcode
RDL and RDLC
Report Definition Language (RDL) is an XML standard used by SQL Server Reporting Services for defining reports. Report Definition Language Client-Side (RDLC) is similar to RDL and is used in Visual Studio for client-side reporting. In general, RDL reports can be viewed as remote reports running in the reporting server while RDLC reports are local reports running completely on the client-side using Visual Studio ReportViewer control.This tutorial shows you how to create barcodes using ConnectCode .Net Barcode SDK in a RDLC report.
Requirements
The following requirements must be satisfied before proceeding to the tutorial on Creating barcodes in a RDLC report..- ConnectCode .Net Barcode SDK is installed.
- Visual Studio 2005/2008/2010/2012/2015.
- SQL Server Reporting Services (with Business Intelligence Studio) is installed.
- Access to the AdventureWorks (or AdventureWorks2008) database in SQL Server 2005, SQL Server 2008 or SQL Server 2012.
Tutorial on creating barcodes in a RDLC (Report Definition Language Client-side) Report
1. Launch Visual Studio 2005/2008/2010/2012/2015.
2. Create a new project by going to File :: New :: Project.
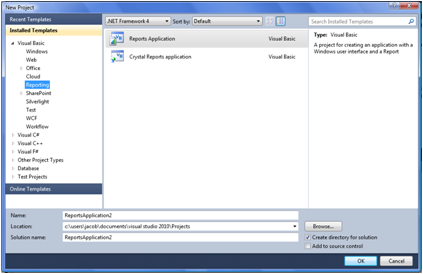
3. In the New Project dialog, select Visual Basic (or Visual C# etc.) in the Installed Templates box. Choose Reports Application and click on the OK button.
4. The Report Wizard dialog will be launched and the first step involves choosing the Data Source. Select Database as the Data Source and click on the Next button.
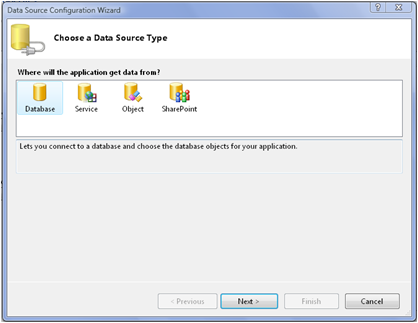
5. Select Dataset as the Database Model and click on the Next button. 6. If you have an existing database connection to the AdventureWorks (or AdventureWorks 2008) database, select it from the drop-down list. Otherwise, click on the New Connection button to create a new connection.
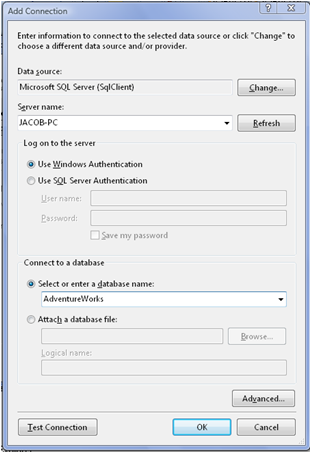
The diagram below shows the New Connection dialog setup for connecting to the AdventureWorks database. Click on the OK button once you have completed the setup, followed by the Next button. Save the connection if you want to reuse the connection in the future projects.
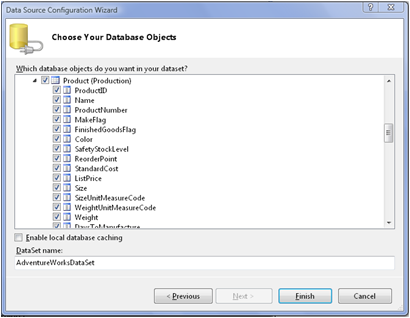
7. In the Choose Your Database Objects page select the Product (Production) table. We will be using the ProductNumber field to create our barcodes later. Click on the Finish button once you have selected the table.
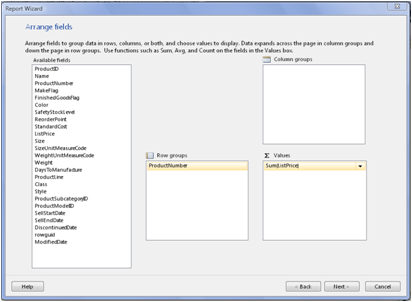
8. Back in the Report Wizard, click on the Next button. In the Arrange Fields page, click on the ProductNumber and ListPrice fields. Your dialog should look like the diagram below.
9. Click on the Next button and in the Choose the layout page, uncheck the Show subtotals and grand totals option. Click on the Next button followed by the Finish button.
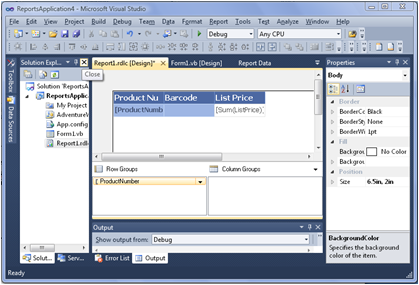
10. A RDLC report and the viewer application will be generated automatically. In the Solutions Browser, double click on the Report1.rdlc file. Create a new column for the report by right clicking on the Product Number Header, followed by the option Insert Column->right. Name the new column Barcode. Your report should look like the diagram below.
11. Next, add a reference to the ConnectCodeBarcodeLibrary.dll. Right click on the ReportsApplication in the Solutions Browser. Select Add Reference, and choose the ConnectCodeBarcodeLibrary.dll in the directory C:\Program Files\ConnectCode\Barcode SDK vX.x Trial\DLL\.
12. Configure and setup the RDLC report. Click on the Report menu and select Report Properties option. Add a reference to the ConnectCodeBarcodeLibrary.dll in the Reference tab. You will also need to add references to the System.Drawing and System.Windows.Forms assemblies.
Note down the version number and public key token. It will be useful later. You should see the Reference Tab of the Report Properties dialog as follows:
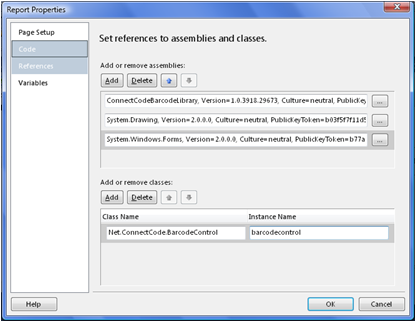
Create an instance of Connectcode Barcode Control by typing Net.ConnectCode.BarcodeControl under Class Name and name the instance as barcodecontrol. You are now ready to use the barcode control in your project.
13. Next, switch to the Code tab of the Report Properties dialog. Enter a VB function (or C# function) that will make use of the instance barcodecontrol that we have created earlier in the Reference tab.
The actual code to be pasted is as shown below.
Public Function MakeBarcodeImage(datastring As String) as Byte()
'Set symbology
barcodecontrol.BarcodeType
=Net.ConnectCode.Barcode.Barcodes.BarcodeEnum.Code128Auto
'Set data
barcodecontrol.Data = datastring
'Enter other properties of the Barcode Control here
barcodecontrol.HumanText
= Net.ConnectCode.Barcode.Barcodes.YesNoEnum.Yes
barcodeControl.Font = New System.Drawing.Font("Arial", 24, System.Drawing.FontStyle.Bold)
return barcodecontrol.GetPNGImage()
End Function
The MakeBarcodeImage(datastring As String) function takes in a string for its input parameter. This function, which uses the BarcodeControl, will encode the data and return a barcode image in PNG format. We will need to place this image in the Barcode column that we have inserted into our report earlier.
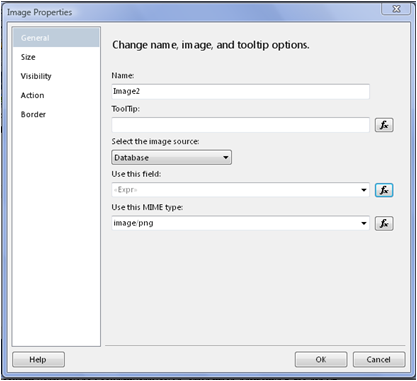
14. Drag an image from the Visual Studio Toolbox into the Barcode column.
- Set the image source as Database and the MIME Type as image/png
- Set the Use this field property of the image to =Code.MakeBarcodeImage(Fields!ProductNumber.Value) in the expression dialog box.
15. Most of the barcode control setup has been completed. However if you run your report application now, you will get an error that says the ConnectCodeBarcodeLibrary.dll is not a trusted assembly. You will need to add the following code after the TODO comments in Form1.vb (or Form1.cs).
VB
Me.ReportViewer1.LocalReport.AddTrustedCodeModuleInCurrentAppDomain ("System.Drawing, Version=2.0.0.0, Culture=neutral, PublicKeyToken=b03f5f7f11d50a3a") Me.ReportViewer1.LocalReport.AddTrustedCodeModuleInCurrentAppDomain ("System.Windows.Forms, Version=2.0.0.0, Culture=neutral, PublicKeyToken=b77a5c561934e089") Me.ReportViewer1.LocalReport.AddTrustedCodeModuleInCurrentAppDomain ("ConnectCodeBarcodeLibrary, Version=1.0.3918.29673, Culture=neutral, PublicKeyToken=null")
C#
this.reportViewer1.LocalReport.AddTrustedCodeModuleInCurrentAppDomain ("System.Drawing, Version=2.0.0.0, Culture=neutral, PublicKeyToken=b03f5f7f11d50a3a"); this.reportViewer1.LocalReport.AddTrustedCodeModuleInCurrentAppDomain ("System.Windows.Forms, Version=2.0.0.0, Culture=neutral, PublicKeyToken=b77a5c561934e089"); this.reportViewer1.LocalReport.AddTrustedCodeModuleInCurrentAppDomain ("ConnectCodeBarcodeLibrary, Version=1.0.3918.29673, Culture=neutral, PublicKeyToken=null");
Note
In the above programming codes, we are using the version 2.0 of the System.Drawing and System.Windows.Form libraries. If you are using a different version, please update the version and public key appropriately. You will be able to get the version number and public key token of the DLLs in Step 12.
Visual Studio 2010
If you are using Visual Studio 2010, you will need to add the following to the App.config file.
<runtime>
<NetFx40_LegacySecurityPolicy enabled="true" />
</runtime>
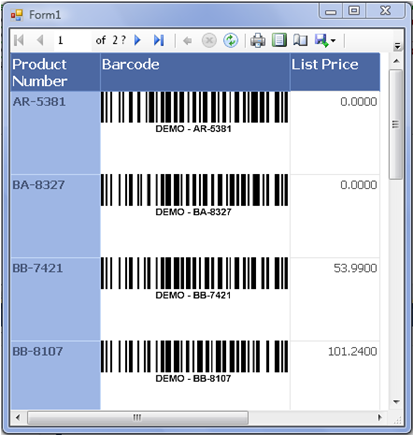
16. You are now ready to view the report. Click on the Debug tab and select Start Debugging. You should see barcode output as shown below.
