How to create barcodes in Angular?
Angular
Angular (or AngularJS) is a JavaScript/TypeScript-based front-end web application framework maintained by Google and the open source community to address challenges encountered when developing single-page applications. It is widely adopted and used by many front-end web developers for building modern web applications.Angular Barcode Components using Fonts
ConnectCode Barcode Software and Fonts package provides barcode fonts and Typescript source code to help Angular developers easily generate barcodes in their Angular applications. Using fonts is a well-known practice in the auto-id industry for generating high quality barcodes that adheres strictly to the industry specifications. The generated barcodes can meet the strictest requirements of customers and easily clear audits and independent verifications tests such as those conducted by GS1.Supported Browsers
- Microsoft Edge 42.17134.1.0 (or above)
- Microsoft EdgeHTML 17.17134 (or above)
- Microsoft Edge Mobile Browsers (42.0 or above)
- Google Chrome 65.0.3325.181 (or above)
- Android Chromium 64.0.3282.137 (or above)
- Opera 54.0 (or above)
- macOS Safari 11.1 (or above)
- iOS Safari 11.3 (or above)
- Mozilla Firefox Quantum 59.0.2 (or above)
Tutorial on creating a Code 128 Barcode Component using fonts in Angular
This tutorial illustrates how to create a Code 128 (Auto) barcode with barcode fonts and Typescript source code provided in ConnectCode Barcode Software and Fonts package.Prerequisites
- npm is installed. npm is distributed with Node.js.
- Angular 6 or 7 (or onwards) is installed.
- ConnectCode Barcode Software and Fonts package is installed. In this documentation, we assumed you are using Windows for your web development. Please be assured that all the fonts and Angular scripts from the installed package can be run on other platforms such as MAC, Linux or Unix.
ng new barcode-app
If the ng command is not available, please make sure you have installed Node.js and Angular.
cd barcode-app
You can skip this step and go to step 2 directly if you already have an existing Angular project.
2. Create a component in the project. In the command prompt, enter the following:
ng generate component code128auto-barcode
This command will generate a component with the name code128auto-barcode. All the necessary HTML, CSS and Typescript files will be automatically generated.
3. Using Windows Explorer, go to the "<ConnectCode Folder>\Resource\Angular\src" folder. The "src" folder contains all the barcode fonts, TypeScript, HTML and CSS files to help create your Angular barcode component. In this tutorial we are going to create a Code 128 (Auto) barcode. If you need other types of barcodes, please check out the Angular Barcode Reference section on the required barcode fonts and component files.
Note
We are using Windows in this tutorial. However, the barcode fonts and source files also work on Angular projects built on other platforms such as MAC and Linux.
4. Using Windows Explorer, navigate to the "code128auto-barcode" subfolder. This folder contains the following files.
- fonts\ConnectCode128_S3.woff
- code128auto-barcode.component.css
- code128auto-barcode.component.HTML
- code128auto-barcode.component.spec.ts
- code128auto-barcode.component.ts
fonts->ConnectCode128_S3.woff
This is a W3C compliant Web Open Font Format (WOFF) barcode font file. This font file displays the generated Code 128 barcode. The "...S3" refers to the height of the barcode. The registered version of the package comes with barcode fonts with varying heights (S1..S7). The different fonts with varying height and font size enables you to generate barcodes to meet all the requirements required by the auto-id industry.
code128auto-barcode.component.css
@font-face {
    font-family: CCode128_S3;
    src: url("fonts/ConnectCode128_S3.woff") format("woff");
  }
.code128auto_containter {width: 5in; text-align: center}
.code128auto {color: black; font-weight: normal; font-style: normal; line-height:normal; font-family: 'CCode128_S3', sans-serif; font-size: 32px}
.code128auto_text {color: black; font-weight: normal; font-style: normal; line-height:normal; font-family: sans-serif; font-size: 28px}
The CSS file of the code128auto-barcode component defines a @font-face tag that refers to the barcode font we are going to use. Note that we have set the font size of the barcode to "32px". We recommend starting with this default font size for testing and later increase/decrease the size incrementally to meet the barcode size requirements.
code128auto-barcode.component.html
This file describes the HTML contents of the Code 128 barcode component. Basically, it contains the barcode "{{barcode}}" and the human readable text "{{barcode_text}}" that appears below the barcode.
<div class="code128auto_containter">
  <div class="code128auto">{{barcode}}</div>
  <div class="code128auto_text">{{barcode_text}}</div>
</div>
For some barcodes such as UPCA/UPCE or EAN13/EAN8, the {{barcode_text}} component is optional. This is because the barcode fonts already comes with embedded human readable text. For other barcodes, the {{barcode_text}} element enables you to further style the human readable text of the barcode.
code128auto-barcode.component.spec.ts
This spec.ts file contains unit tests for your source files. This file is not in use and is included for completeness.
code128auto-barcode.component.ts
This is the component source code and it shows how to call the "code128auto.ts" library to generate the Code 128 barcode. In the code below, the "code128auto.encode()" function generates the barcode and returns the generated barcode characters to "this.barcode". The human readable text that commonly appears below the barcode is available in "code128auto.connectcode_human_readable_text". The generated barcode characters when applied with the barcode font will give you the actual barcode.
  ngOnInit() {
  var code128auto=new Code128Auto(this.data);
  this.barcode=code128auto.encode();
  this.barcode_text=code128auto.connectcode_human_readable_text;

}
code128auto.ts
The library for generating the command characters such as start/stop and check characters required by a barcode to adhere to the industry specifications. This library also validates input data and removes unsupported characters. If you want to integrate barcode generation into your own Angular component, this is the file to integrate with.
6. We are now ready to make use of our component to generate the Code 128 barcode. Open "app.component.html" with your editor. Replace the HTML inside with
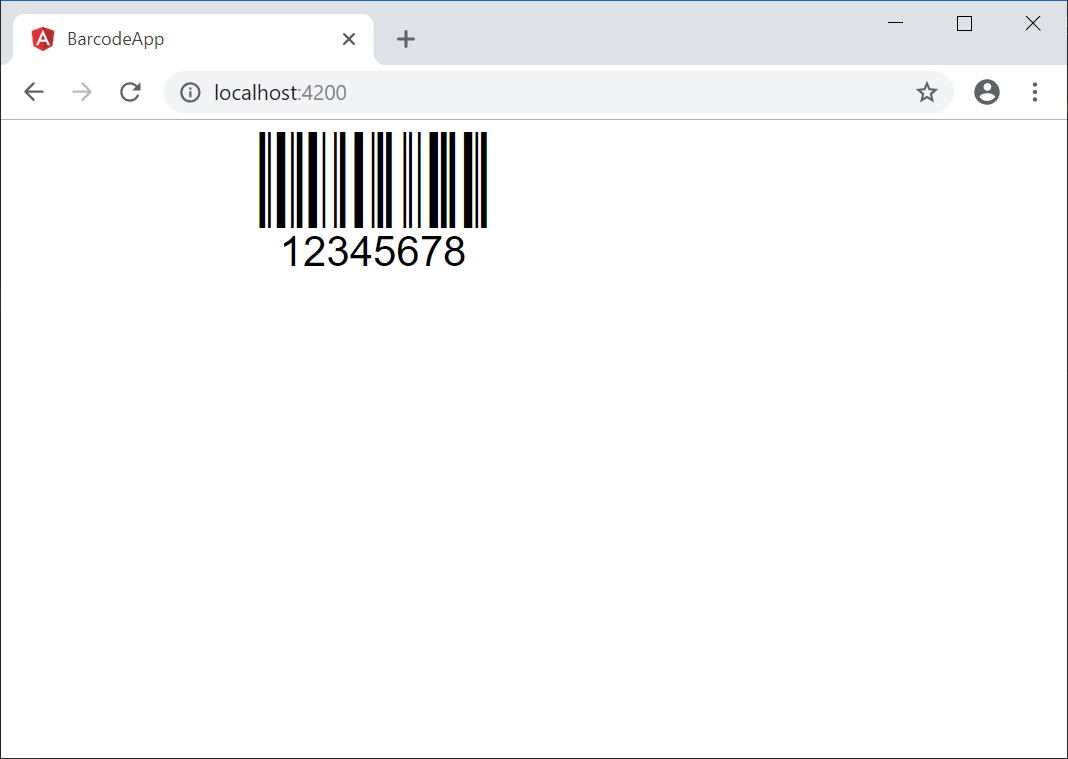
<app-code128auto-barcode data="12345678"></app-code128auto-barcode>
Basically, our app uses the "app-code128auto-barcode" element to generate a Code 128 barcode with the input data "12345678". You can replace "data" with data from your application. Other barcodes may contain attributes such as "checkDigit", "extendedStyle" or "gs1Compliance. Please refer to the Angular Barcode Reference Section for a complete description of the attributes supported by the different barcodes.
7. In the Command Prompt, enter the following:
ng serve --open
The --open option automatically opens your browser to http://localhost:4200/. You should see your browser display the Code 128 barcode as shown below:
You can print out the barcode on your printer and test scan it with your barcode scanner. There are scenarios where you are generating the barcodes as part of a report or in your own component. In these scenarios, you can just use the barcode font ConnectCode128_S3.woff and the code128auto.ts library. The Angular Barcode Reference Section describes all the linear barcodes that you can easily generate using barcode fonts in Angular.